KreditBee: In this post, we are going to talk about our KreditBee app. How do you get a personal loan through the KreditBee app? How do you apply for a personal loan? I will walk you through the complete process step by step. You can easily get a personal loan through the KreditBee app.
Unlock your Financial Freedom with kreditBee app
Personal Loan
So, if you need money urgently and immediately. Or if you need money for some emergency. You can easily get a personal loan through the KreditBee app.
Interest Rate
So first, you can easily get a personal loan from 1,000 to 400,000 through the KreditBee app. Its interest rate is up to 29.95%
Tenure
The next second is the tenure of the loan. So, until when can you repay that loan amount through EMI? 3 to 24 months, so you can freely select whichever tenure suits your budget.
Apply all online
you see the KreditBee application process of this; it is completely 100% online, there is no paperwork involved
If you successfully apply for a loan through the KreditBee app, then it will be done within one hour. Otherwise, the loan amount will be credited directly to your bank account in ten minutes. They will transfer it instantly.
Repayment
They have an easy repayment option, so you can easily repay the loan amount through EMI.
If you are a salaried person or a self-employed person. Both people can get a loan on this app. The only thing is that you have to be 21 plus.
Safe and secure
Apart from that, you should have both a PAN card and an Aadhaar card. Another important thing is that this KreditBee app has been given a rating of 4.5 on the Play Store. Apart from that, it has been downloaded more than 5 crores, so you can trust this KreditBee app and get a personal loan.
Now, how do you create an account on the KreditBee app? How do you apply for a personal loan? How do you complete KYC? I will tell you everything in detail step by step.
How to get personal loan
Download
Now the link to get a personal loan through the KreditBee app is given at the end of this post. Click on it, then go to the Play Store and download the KreditBee app and open it.
Incident personal loan
First, they ask you to select the language, so select English and then click on Continue. Now if you look here, there are three types of loan options. Here, you can get an instant personal loan of up to 400,000, so the first option is the personal loan salary. So, if you are a salaried person, then you can get an instant personal loan up to 400,000.
Flexi personal loan
The second option is the Flexi personal loan, where you can get a personal loan up to 1 lakh rupees.
Purchase on EMI
The third option is Pay on EMI, where you can buy anything up to one lakh rupees on EMI. So, my suggestion is that if you want a normal personal loan, then you should select the second option. If you see there, there is a Flexi personal loan. Select that.
How to create account
Now, to create an account on the KreditBee app, click on Login or Sign Up with Mobile. Next, enter your mobile number to sign up. Now, enter the same mobile number that you have on your PAN card. Because only then will it be easy to check your credit score. Next, there will be I Agree to Terms. After that, tick the box next to it and click on Continue.
Now, Verify Mobile will say that an OTP will be sent to your mobile number. After entering that OTP, click on Submit. Your mobile number will be successfully verified. Now they have asked for a lot of permissions here; they have asked for location access, camera access, photo library access, and microphone access on your phone, so you have to give all these permissions.
Loan Eligibility
Then there is the I Agree to Our Terms of Service. After ticking the box next to it. Click on I Agree. Now if you see here, it says Lending Partner, so you can see their Lending Partner. That is, who are they, as a whole, who are providing loans? You can see that, partner.
For example, Krazybee Service, IIFL Finance, Mas Finance Services, and Cholamandalam Investment and Finance Company are all their lending partners. Is there any such thing as “I authorize credit B in sharing details with any of the lending partners”? After ticking the box next to it, click on “Continue.”
Now they are asking if you have a referral code. So there is no such thing as “I don’t have a referral code”? Click on that. Next, they are asking for PAN details, so after you enter your PAN number, tick those two boxes and click on “Submit.”
Now they have asked for income details, and then they have asked for employment type, so are you a salaried person or a self-employed person? Whatever it is, select it here and now. Enter how much you earn in a month in the monthly salary. Then tick the box next to it that says “I agree,” and then click on submit. Now they are checking your loan eligibility. They are assessing it.
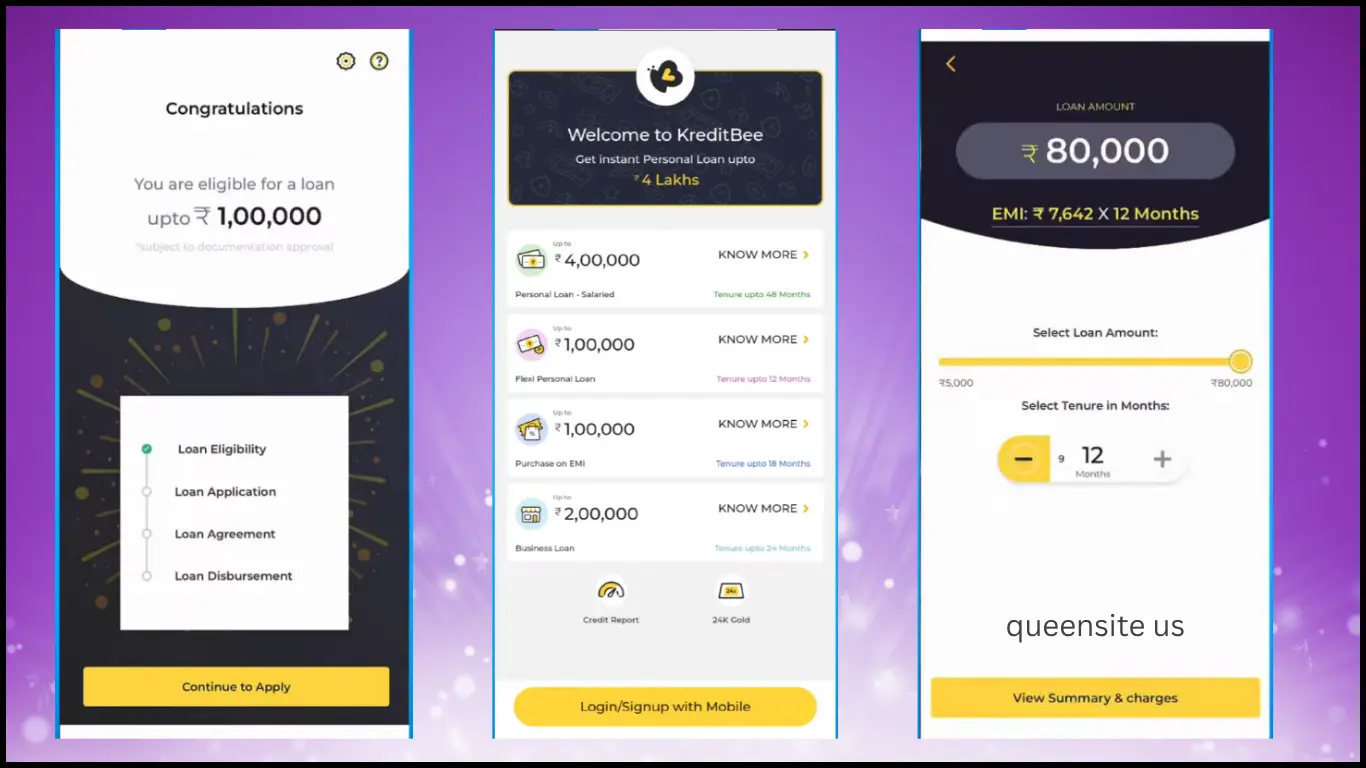
It will take some time to arrive. After that, what do you do? Click on the refresh. You will get similar regulations. You are eligible for a loan up to one year. That’s how it is. So we have completed our first step. If you look there, the loan eligibility is like that or not. We have completed that step.
Next, you will have to fill out the loan application, and then you will have to make a loan increase. After that, the loan will be disbursed; that is, the loan amount will be transferred to you.
Loan Application
So, now you have to fill out the loan application. Click on Next to continue applying. They are asking for profile information. They are asking for KYC documents. So click on that. KYC documents are asking for address proof. So, you can also submit address proof through your Aadhar card.
So, upload the address proof next to it. If it doesn’t work, click on that. So, there are three methods to upload address proof. First, paper; second, verify; third, DigiLocker; fourth, upload passport. What is my recommendation here?
Verification
If you select the first one, if you look there, is there a paper like that? Select that method; it is a very easy method, a fast method. So click on that. Now here you enter your Aadhaar number. After that, look at the captcha and fill it in there. There is something like “I understand and agree to download my KYC data.” Tick the box next to it, then click on submit.
Now when you create your Aadhaar card, you must have given a mobile number; that is, an OTP will have come to the mobile number linked to your Aadhaar card. After you enter that OTP here, click on submit, and your Aadhaar number will be successfully verified.
There is a second base ID verification here, so it will look like you are capturing a selfie of yourself so you can proceed to take a selfie. Your camera will open now; you can click on the camera item and capture your selfie in good lighting, and then your selfie will be uploaded successfully.
Now that you have uploaded both the address proof and selfie, click on submit. Next, they are asking for your general information. Click on that first; they are asking for your email ID, so there is a batch email from Gmail like that. Then click on Continue. Now select which email ID you use the most, or your main email ID. Your email ID will be successfully verified.
Next, they are asking for your marital status, so select whether you are single, married, or divorced. Next, they are asking for your education, so how long have you studied? For example, bachelor’s, master’s, diploma, whatever. Next, they are asking for your occupation, so select which job you are looking for. Next, they are asking for your communication address, so if the address in your Aadhaar and your communication address are the same, then tick the box next to it.
Next, they have asked for the type of residency; that is, do you have your communication address? If it is not an owner’s house or two, whatever it is, select it there and then click on Continue. Next, there is a reference; click on that. Now, you will be given the number of your father, mother, or spouse as a contact reference. So, I can contact them to verify your loan application.
If not, if you take a loan and, in the future, you will not repair the TV with that loan amount, but you will not answer their phone. What will they do at that time? For their safety, they will contact your reference. Do this: take a loan from them and repair it, tell them to come and pay it quickly, and they will come and convey it to them, so you can give that reference to them later. So if you look there, it says “Select from Contact.” Click on it and add their number, then click on “Continue.”
Now your loan application has been submitted for approval. It will take some time to arrive. After that, click on refresh. They will fetch your profile. You can check your application status right here. You can check the details of the loan and how much you can borrow. You can check it all right here. Now, what do you do? Click on check status. Next, you will see the home page of this credit bank.
Now, if you want to buy a personal loan through this, there is a Blood Ship Personal Loan Bank Transfer App for up to 80,000 with a tenure of up to 12 months, right there? Click on Get Now next to it. They have increased the credit limit to 80,000. Then there is the “I acknowledge the offer. After ticking the box next to it, click on Continue. Now, if you want to buy a Plex Personal Loan through this, is there something like a bank transfer up to 80,000? Click on Get Now next to that. Now, they are reviewing your credit profile. It will take some time.
Next, you can check your loan amount here. Then you can select the tenure base and see how much EMI you will pay per month. You can also check it in detail here. Then, select the loan amount here. So, select how much loan you want here. So, you can take a loan from ₹5000 to ₹80,000. So, adjust the loan amount you want here and select it. Then, select the tenure in minutes. So, whether you have taken the loan amount and for how many months you are going to split it through EMI and repay it, select that tenure.
For example, 6 months, 9 months, or 12 months—whichever tenure you have, select it here. Now, for example, let’s say you want a game loan of 80,000. You have selected the tenure of 12 months. If you come every month and pay EMI, it will be 7642 rupees and pay EMI. So, you select both your loan amount and tenure here. Then click on the View Summary and Charges button. Next, you can see your loan amount there. Then you can see the total interest payment. Then you can see the annual interest rate and annual percentage rate. All of that can be seen there.
Fees and Charges
Apart from that, you can also see what other fees and charges you will be charged as you pay. So, how much is the processing fee, how much is the one-time charge, how much GST is there, and how many loan documents are free? You can see all that in detail right there. Now, delete all these piece charges from your loan amount. That is; after subtracting it, how much will be transferred to your bank account? You can see that right there. You can also see the loan tenure right there. After seeing all this, click on your repayment schedule.
Now, after you have taken the loan for 12 months, how much principal will you pay, how much interest will you pay, what is the due date, and how much EMI will you pay per month? You can see all of that in detail here. Then, if you have not paid the loan amount correctly, how much are the penalty charges? How much overdue interest is there? You can see all of that in detail here. After seeing all of that, click on Continue.
Loan purpose
For what purpose are you taking this loan? You have asked for it, so click on Select Loan Purpose. Whether it is medical expenses, house expenses, wedding expenses, education, shopping, vacation, personal reasons, or vehicle purchase, select it here and click on continue.
Add bank account
Now the loan amount will be transferred to your bank account, just like you would add a bank account to transfer it, and only then will you be able to receive your loan amount in your bank account.
For that, click on Add Savings Bank Account. Now, to add a bank account, you must enter the IFSC code of your bank. Enter the account number. Then, I confirm the account details. Tick the box next to it and click on Add Account. Now, for account verification, 1 rupee will be transferred to your bank account. You must check it. Check your bank statement. Then, click on Continue. Your bank account will be added successfully. Now, they are asking you to select a bank account. So, your bank account is here. Select and click Continue.
Sign Loan Document
Next, you will be asked to sign your loan document. If you see there is a digital sign with Face ID, click on Continue. They are fetching your profile. Then your loan document will open right here. If you see there, there is a box next to “I have returned understudy”; tick it and click on “Continue to Sign Loan Document.” You can see your loan documentation in detail here.
Then click on Continue. Now if you see here, there are many terms and conditions. If you see there are three terms and conditions boxes, tick all three boxes. After doing that, click on Continue. Now an OTP will be sent to your mobile number. Enter that OTP here. Then click on Submit.
Face ID Verification
Lastly, you will get a screen like Face ID Verification. You will get a screen like clicking a selfie of yourself. Click on Proceed to Take Selfie. Your camera will open. Now, click on those cameras and capture a proper selfie of yourself. If you see your loan application, it has been successfully submitted. This loan will take about one hour to process. I know that the loan amount will be transferred to your bank account in 10 minutes. You should definitely check it.
Now, if you want a higher limit loan, you will be asked to complete the video call, so if you see it there, it will say “Complete video call.” Click on it and you can complete your full video call. You will be asked to show your Aadhar card, PAN card, all this, so after completing this video call, you can easily apply for a personal loan where you will get a higher limit loan.