iOS 26 Features
From transparent icons, new custom ringtones, face gestures, and a bunch of hidden settings, grab your iPhones ’cause I’m going to show you the top new features of iOS 26.
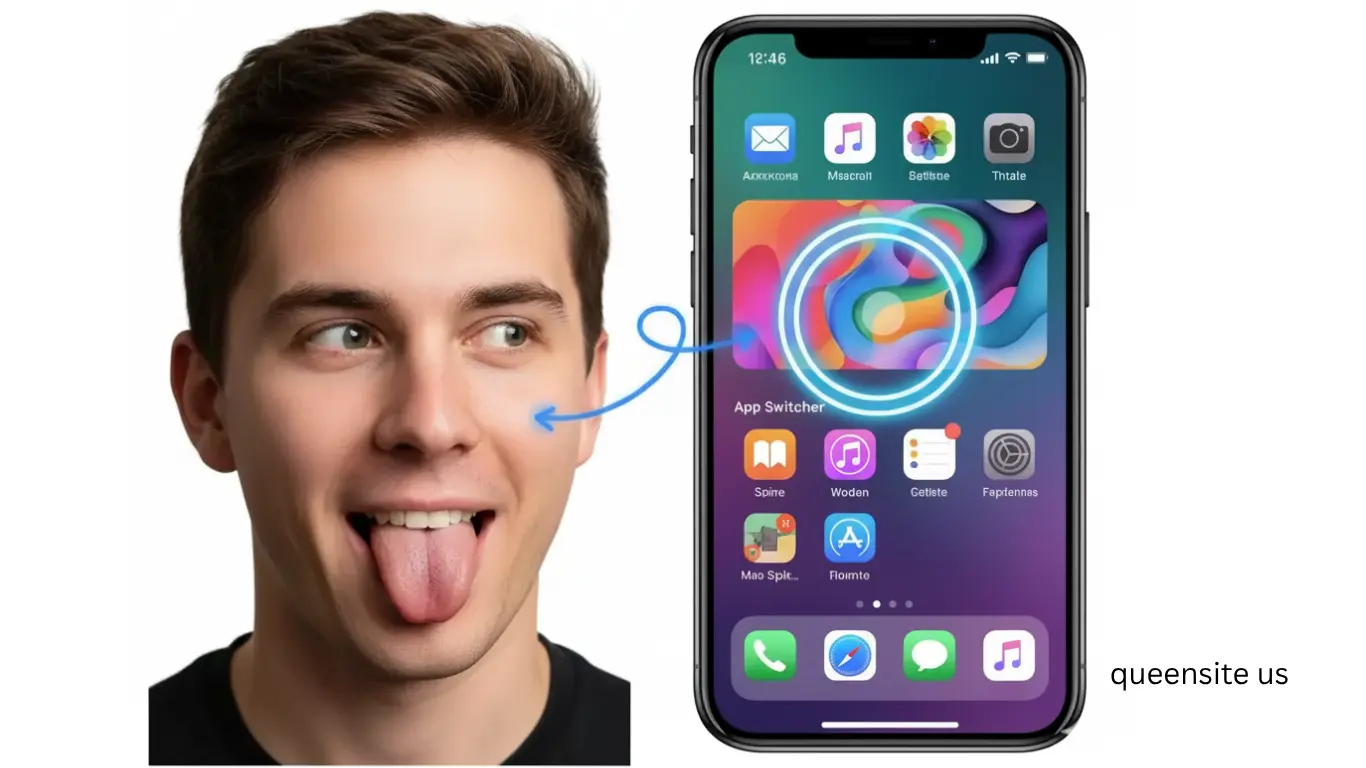
iOS 26 Features FACE GESTURES
Okay, so you guys have got to see how crazy cool this is! You can control your entire iPhone with just your face now, and it’s something you just have to try for yourself.
So, to set it up, what you do is go into Settings, then down to Accessibility, and you scroll all the way down to here and look for Head Tracking. And this is where you can play around. So under Pointer, you can say Track with Face. I just recommended it’s much easier. Then go back, scroll down, and turn off the Dwell Control.
Now, over here, you see all these gestures like sticking out the tongue and smiling. If you open those up, in each one is a massive list of actions all used to control your phone. Like, for example, for the Smile gesture, I chose a Single Tap, and for the Sticking out my Tongue gesture, I chose App Switcher. And finally, after that is done, you’re going to turn on head tracking.
Now, here is how it’s done. All you got to do is move your face to control the pointer, then smile to single tap, pout right to scroll up, and I chose pout left to scroll down, and as you saw earlier, stick out your tongue to go to the App Switcher. I mean, this is absolutely nuts, and I could not believe how well it worked. You could literally use this to scroll through TikTok or Instagram. Just, wow!
QUICK NEW FEATURES
But there are even better features that I still got to show you! Now, let me show you three must-know features that you guys are going to love.
So, number one is if you go into the Photos app and look for any picture with a subject in it, like this one for example. Then right over here at the top, you’ll notice this new icon that if you tap it, then BAM! It instantly turns that pic into a 3D spatial scene.
And then you can Just tilt your phone around to basically make that photo come alive. What’s so cool is you You can try this with any picture, so it doesn’t have to just be the ones you took with your iPhone; so, so long as it has some sort of depth to it, you can turn it into a spatial picture. And the coolest thing about this feature is that it works on wallpapers too, and I’ll show you how to do this in just a moment.
Because the second must-know feature, you won’t believe it, but now if you plug your iPhone in to charge, hidden in plain sight, right at the top, you can see the charging time. Basically, how long it’s going to take you to fully charge. Finally!
And for the third must-know feature, if you open up an app like Messages and then access the keyboard, if you tap on the emoji icon and then GenMoji, you’ll now see this new emoji icon, which you can use to select two or more emojis and combine them into one. It’s still in beta, so the generations aren’t always amazing, but still, I was super impressed. And it seems to work with literally every single standard emoji. So, definitely try this one out because what’s also nice is once you’re done, you can add that emoji to your message, hit send, and it shows up like an actual emoji for other iPhone users. Pretty cool!
LOCK SCREEN
Now, let me show you everything new with the Lock Screens.
Alright, now on your lock screen, if you just tap and hold down and add a new wallpaper, tap on Photos, and again, this time make sure you select a photo with depth in it, similar to, say, this one. Once you’ve found one, you see this new button here; tap it because voilà, you just made your wallpaper a spatial scene. Honestly, it’s absolutely nuts how well this works, and it just makes your lock screen look so freaking good. So try this out with a bunch of different pics, whether it’s pets, people, or even something more cartoonish; just as long as there’s depth, it’ll work no problem.
Okay, but here are a few more cool things you can do with the Lock Screen, like you can now finally move the widgets from a top position right under the clock, or if you prefer, depending on your wallpaper, keep them at the bottom. Nice!
As for the clock, you can also customize it a bit more with this font because once you select it, you’ll notice this little bounding box in the right corner, which, if you select it, you can use to make the clock bigger or smaller. There’s also a brand new clock style you’ll find right over here called Glass.
So you can choose from all these different preset colors, again, whatever suits your wallpaper best, but what I really like is you can adjust the transparency of the glass with this slider. So if you want it to look like a bit more of a subtle lighting effect or saturated glass, you decide. And of course, there’s still the Solid option, which has more of a flat look. So with all that, you have some pretty sweet options to get a banging -looking lock screen.
But if customization is not really your vibe, another option is to go for the Photo Shuffle, because what’s cool about this is once you’ve selected all the different pictures you want to shuffle through, every time you tap or unlock your phone, the clock automatically resizes to your images. And again, it just looks so good!
HOME SCREEN
Okay, so by now you’ve probably noticed that a couple of design elements like the notifications, all the native and normal app icons, and even the Control Center all have this glassy look.
So if you tap and hold down on the home screen, then tap Edit, and under Customization, you’ll see this Clear option. And if you tap on it, you make the icons even more glassy and more transparent.
I personally think it’s such a clean look. And a nice tip is on Photo Widgets, if you edit the widget, you can choose to still display your photos in full color and not this kind of clear look, which I really love.
But going back to the icon customization, you also get this Tinted Clear look, where you can use the Color Picker to select any color from your wallpaper, whatever it might be. And just like the clock on the lock screen, you can adjust the transparency of the glass look. Or you can even use this Color Slider to choose one of these colors.
So overall, there are basically four different icon styles you can pick from. There’s Default, Dark, Clear, Tinted, and all of them have this kind of glassy look to them.
But if you don’t like this glassy look, there’s actually a way you can change it. It’s super hidden, but let me show you how.
All you do is head into Settings, then into Accessibility Settings. Then inside Display and Text Size, you can turn on Reduce Transparency. And that’s it! Now, your Control Center is a lot easier to see and way less see-through. Your notifications are definitely more readable. And a bunch of other liquid glass design elements are no longer clear or see-through. So, depending on what you prefer, you’ve at least got the option.
MESSAGES
Okay, now you’re going to want to jump into your Messages because there are some sick new features you have to try. And they’re actually kind of hidden.
So, in a chat with a friend, if you tap on their name, right over here you’ll see this brand-new
Option: Backgrounds. So now what you can do is choose a custom chat background.
The first option you have is to pick one of your own pictures. And I suggest you try to go for something that’s not too busy. But the real magic is in these preset animated options.
So there’s this awesome color background where you can choose between a bunch of different options, or you could even pick the two colors yourself. But as you can see, the wallpaper just slowly and subtly animates behind the scenes. There’s also a Sky, Water, or Aurora option. And again, each one of them comes with a slightly different theme or color variation that you can pick from. And in typical Apple style, they just look so premium and polished.
Just a quick heads up though, whatever background you pick, it also changes the chat background on the other person’s phone you’re chatting with. So whatever you pick, just remember, it’s going to show up on their phone too. Okay?
Okay, once you’ve got your wallpaper all figured out, another new feature in this Info tab you’ve got to turn on is this Automatically Translate option. Because once you select it, you can choose your language. So, like for me, it’s English, UK. And then you can select the language you’d like to translate from. So this will be the other person’s language, like French, for example.
Now, whenever you type something to that person in that specific chat, you’ll notice this little translation will appear above your message. And when they get your message, it’ll be translated into French. And when they send a message back to you, it’ll automatically translate to English. Pretty cool.
HIDDEN FEATURES
But now, let me show you some hidden features. So, if you want to get more battery life, then you are definitely going to want to turn this on. It’s actually really hidden inside the Battery settings. Then if you scroll down right over here under Power Mode, it’s called Adaptive Power. And turn this on because when you do, you’re basically telling your phone, “Hey, manage your power consumption so I can get better battery life.” It’s that simple.
Another new feature I recommend you turn on is inside your app settings. You can tap the M to quickly get to the Music app. And in here, right at the bottom, make sure you have Animated Art turned on. Because now, when you start playing a song in Apple Music, on your lock screen, if you tap the album artwork, boom, it animates on your lock screen. It’s kind of like having a music visualizer, and I just think it’s such a great feature.
But it does get even better, because back inside those Music settings. If you go into Song Transitions, instead of having this set to Crossfade, change it to this new AutoMix option. Because what this will do is AutoMix your Apple Music songs. Kind of like how this song will mix into the next song.
CAMERA
Alright, let’s finally talk about what’s new with the camera because there’s a lot. The first thing you’ll notice is down here you can switch between Video and Photo mode. But if you want to access all the other modes, all you’ve got to do is just swipe left or right at the bottom and bam.
The second new thing is, you see this little button at the top. This now brings up all the different camera mode settings. But it’s kind of tricky to reach with one hand. So instead, you could just swipe up to reveal them, and swipe down to get rid of them.
Now, this next setting is something you should turn on straight away, maybe even on your parent’s phone. And what you do is head inside your Camera settings, scroll all the way to the bottom and turn on Lens Cleaning Hint. Because now, if your lens is oily or dirty because you touched it by mistake, your phone or your parent’s phone will literally tell you to clean it.
But besides the cameras, here’s what’s new in the Phone app. So this feature is going to save you a ton of time. So, if you go inside your Settings, scroll to the bottom again into Apps, and tap the P to quickly get to the Phone app. Then in here, scroll down and turn on this new setting called Screen Incoming Calls.
Then check it out. When your iPhone gets a call from someone who’s not saved as a contact, your iPhone will automatically answer and screen that call for you. It’ll then ask that person what their name is along with the reason they’re calling.
Then, once they’re done, your phone will ring and show you exactly what that person said so you can decide whether you want to answer or not. Seriously, this is the best way to dodge calls that you don’t want to answer, so make sure it’s turned on.
But it kind of gets even crazier. Because if you’re already on a call, you can now tap these three little dots to show this new Live Translation option. If you turn it on, just like with text, you can now pick the other person’s language, like French, and set your language to, let’s say, English.
Then once you’ve decided on your languages, just hit Start Translation. And now everything you say instantly gets translated to French, and everything they say gets translated to English.
HIDDEN RINGTONES
Now, believe it or not, you can finally set your own custom ringtones without having to buy songs from iTunes or Apple Music. It’s super hidden, but here’s how you do it.
First, open up your browser to YouTube and search for whatever song it is you want to have as your ringtone. I went for this GTA Marimba Remix. But then you’re going to click on the URL and remove the UBE. As soon as you click Enter, it’ll open up this page where you can now select the exact length of time you want your ringtone to be. And make sure it’s no longer than 30 seconds. Then hit this button to download that track.
And here is where you now set it as your ringtone. So, within your Downloaded Files, tap on the song you just downloaded, hit the Share icon, then just swipe up and right over there, and use it as a ringtone. It’s kind of crazy just how hidden this is, but once you’ve tapped that, you’re done. Nice. And now whenever you get a call…
BONUS FEATURES
Now, onto some bonus features and updates, which I love. So first is in the Clock app. If you set up an alarm, when it goes off, you’ll now notice this brand-new design, which I think is so much better and also just so much easier to start or snooze the alarm.
Speaking of snoozing, back inside the Clock app under Alarms, you now have the option to choose your Snooze Duration. You can choose between one or 15 minutes. So, I don’t know, maybe you want eight minutes of snooze time. And now, whenever your alarm goes off, just tap that snooze button and you get eight more minutes, baby.