What is the Mera Ration 2.0 App?
Hi friends, in this post we are going to see some great information. That is, in this post we are going to see information about the Central Government’s new mobile application called Mera Ration 2.0. So, there are many differences between the normal TNPDS website and this mobile app.
Specifically, you can update your mobile number. You can update the mobile numbers of all your family members. Not only that, but you can also edit their names. So, regarding this app, they have brought in options to edit all the details. In addition, you can download the sales receipt, including the sales receipt for this year’s ration purchases.
Similarly, if you have migrated from one district to another, and you need to temporarily change your address or buy goods from a ration shop in that district, you can transfer your ration card. That option has also been provided. So, if you ask how to do all this, first open the Play Store on your mobile.
How to Use the Mera Ration 2.0 App (Step‑by‑Step Guide)
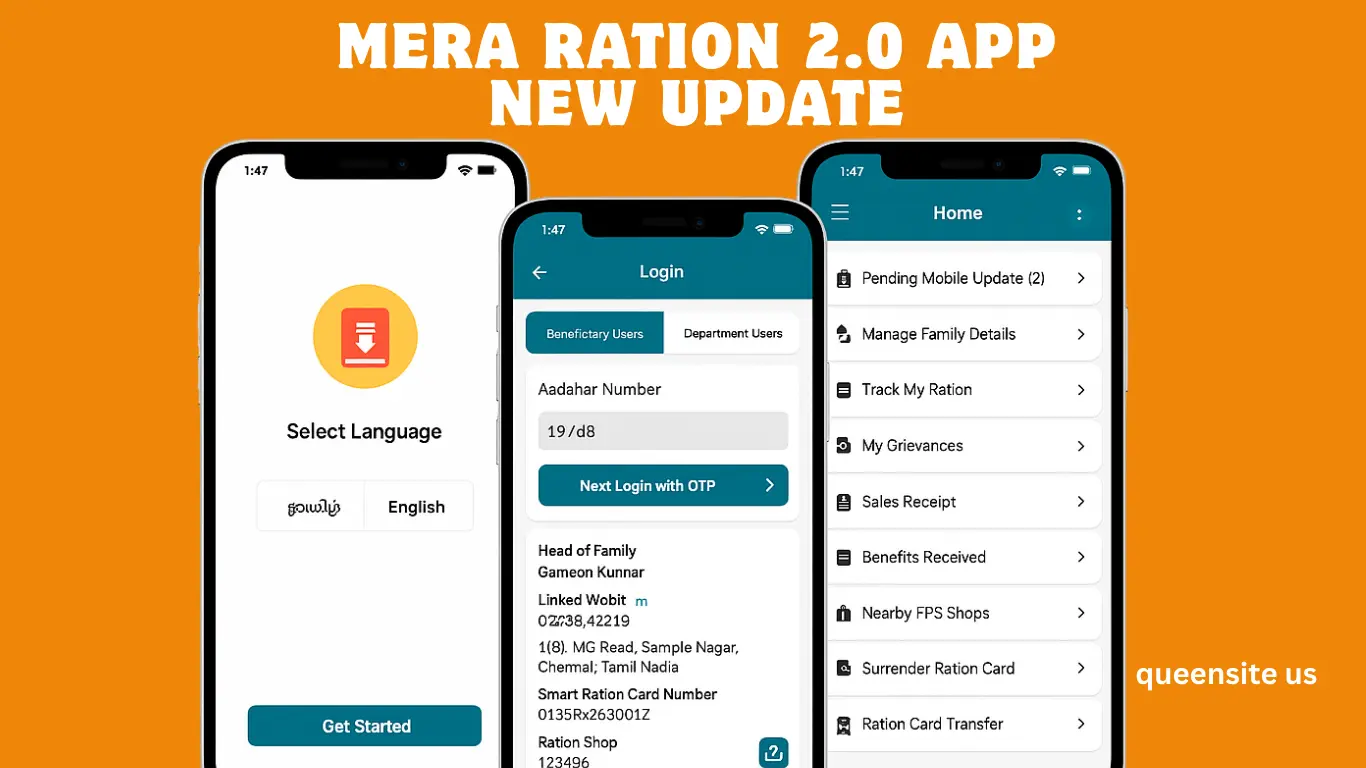
Just like installing a normal mobile app, type “Mera 2.0” and search, and you will get an app like this. Install it and open the app. Just open it, and immediately it will ask if you want to allow notifications; just allow it. Next, your mobile app will open like this. So, first, they have given the option to select the language. If you want Tamil, select Tamil; if you want English, select English. Select whichever is comfortable for you.
👉 “If you’re interested in other useful apps, check out our Story TV app review
Next, click on the “Get Started” option. Below this, under Login, there will be two options: Beneficiary Users and Department Users. For the general public, the Beneficiary Users option should be selected. So, one advantage here is that, regarding the TNPDS website, only by entering the mobile number registered in the name of the head of the family can you view all the details of the ration card.
But with this mobile app, you can log in using the Aadhaar card number of any of the family members. For example, if there are four members, you can log in using the Aadhaar card number of any of the four. That’s the kind of app this is. So, they have provided that advantage. For example, I am not typing the Aadhaar card number of the head of the family now; I am typing the Aadhaar card number of a family member. So, you can check it; it will log in. Okay, I have typed the Aadhaar card number of a family member.
Below, you will see a captcha code in a gray box; carefully type that captcha code. Click on the “Next Login with OTP” option. Next, you will see “OTP sent successfully. “Click OK. Next, you will receive a six-digit OTP message. You need to type that OTP number correctly in this box. So, just enter the OTP and click on the “Verify” option. Next, you will see “OTP verified successfully.” Click OK. Next, it will need to create an MPIN. Click on the “Create Now” option and create an MPIN with four numbers that you can easily remember.
Click Next. Type the same MPIN number you typed before again and click on the “Create MPIN” option. Next, click OK. Next, you will be asked to turn on the location. So, turn on the location. Now, as soon as you do that, you will see that I have logged in using a family member’s Aadhaar card. So, as soon as I logged in, all the details appeared. It displays when the Aadhaar card was issued, what type of Aadhaar card it is (PHH or NPHH), and all that information under the scheme name.
👉 “For more on government‑backed schemes, see our insurance guide
Downloading Digital Ration Card from Mera Ration 2.0 App
Regarding the Head of Family, the name of the person who is the head of the family will be displayed. The mobile number that is linked will be provided, along with the address and the smart ration card number. The name and number of the ration shop where you currently purchase your provisions are also provided. Now, if you need a digital ration card, you see the download option, right? There will be a downward-pointing arrow icon. Just click on it, and your digital ration card will be downloaded. After downloading, you can open and view it using any PDF viewer. So, I’ll open it and show it to you.
Okay, it will open like this. You will see your ration shop number, ration card number, and the head of the family’s number. Below that, you will find the details of all the family members. Okay, next, to update the mobile number, look here; there is an option called “Pending Mobile Update.” That is, for this family, there are a total of three family members on this ration card. It says that the mobile number has been updated for only one person, and the mobile numbers for the remaining two have not been updated.
So, click on this “Pending Mobile Update 2” option. Here, it says, “Enabling you to update the mobile numbers for every family member.” So, you can update the mobile numbers of all the family members. For that, just click on the ‘OK’ option. So, all the family members’ names are listed here. Just click on the ‘View’ option, and if you want to update the mobile number of a family member, type your mobile number in the ‘Mobile Number’ box and just click submit. Your request will be submitted.
Updating Family Details in Mera Ration 2.0 App
That is, they will send an OTP to the mobile number you provided. After you enter that OTP, your request will be submitted. After that, if your Taluk Supply Officer verifies and approves it, the mobile number will be updated. So, this kind of option is available. Next, there is an option called ‘Manage Family Details.’ Just click on this option.
Here, the details of whether the Aadhaar has been verified or not will be provided. So, if the Aadhaar has not been verified yet, just go to your ration shop and get your Aadhaar verified. Update all the KYC details. If you want to change the name, do you see that ‘i’ symbol? Just click on that ‘I’ symbol. Here, you can change the gender, date of birth, and relationship.
Okay, next, you can view the details of the head of the family. Just view it by clicking the eye symbol, and if you want to edit anything, look below; you’ll see a green pen-shaped icon. Click on that. It will ask, “Would you like to update the family member?” Just click the “Yes” option, and you can edit their name if you want. You can also edit the gender, marital status (whether they are married or not), and other such details. The option for that is provided.
After that, there will be an option called “Track My Ration.” Just click on that option. However, this is not currently working. Similarly, there will be an option called “My Grievances. If you have submitted any grievances so far, they will be displayed here. If you want to raise a new complaint about the ration shop or the distribution of ration items, you can click on the “Add New Grievance” option and raise a complaint; this is the option for that.
Benefits of Using the Mera Ration 2.0 App
Similarly, if you want to download the sales receipt, click on the “Sales Receipt” option. Here, you will see “Sales Receipt.” If you click on it, the PDF file will be downloaded automatically. So, this is the sales receipt for your last purchase. There will be an option called “Benefits Received” by the government. “If you click on this, it will show details of when you purchased items this year, in which months, the amount, and the subsidy amount.
“Nearby FPS Shops” means that it will show you which ration shops are near your address and their location, address, and distance in kilometers. In case you no longer need your ration card, you can surrender it by clicking on the “Surrender Ration Card” option. Or, as I mentioned earlier, if you have moved from one place to another for work and need to buy provisions from the ration shop in your new location, you can transfer your ration card. You can transfer it to your current address. To do this, click on the ration card transfer option, provide the details, and you can transfer your ration card.
First, understand the information about this app. Further, we will update information on how to edit each option in this app in our subsequent posts. Similarly, after we finish editing in this app, we will also update information in our subsequent posts about whether the Tamil Nadu government approves this edited application or not.
This is an app created by the Central Government. TNPDS is the app of the Tamil Nadu Government. But all the details are now starting to be updated in this app; they have brought a single central app for all of India. So, this is a good app. Learn about this information and share it with many people. We will meet again in another useful post. Thank you.