Hi, hello. Now, we’re going to see how to create invitations for weddings, college events, or birthday functions. We can easily create them in many designs very simply. Let’s see how. Type “Canva” in Google. Type C-A-N-V-A and press Enter. Now, you see a website displayed first, canva.com? Click on this and open it.
Getting Started with Canva Invitation Maker
Now, this is the website. You will need to sign in here. You see “Sign up for free” here? Click on this. As soon as you click, you can sign in using your Gmail account if you have one. Or, if you have a Facebook account, you can sign in using that. Okay? I’m going to select “Continue with Google”. After selecting that, type your Gmail address here. Type your Gmail password here. Type your password here and click Next.
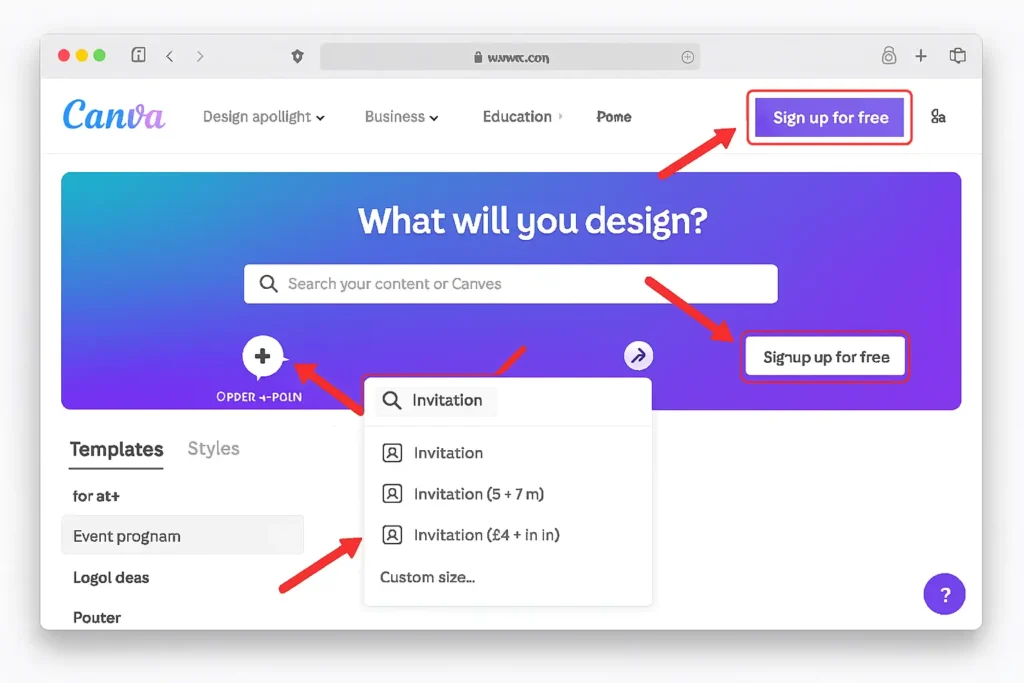
Now, we have signed into this website through our Google account. Now, in the top right corner, you will see the login information for that Google account. Now let’s see how to create an invitation. Now, in the top right corner, do you see “Create a design”? Click on this. As soon as you click, a search option like this will appear. Type “invitation” here.
As soon as you type “invitation,” you’ll see many options below, right? Now, if you move the cursor over each of these options, you’ll see the card size displayed on the side. 5×7, and then 14×14. Suppose you want to create your own invitation card size; do you see “Custom size” below? Click on that. As soon as you click, it will show us options like this. On the right side, there’s a down arrow next to “px,” right? Click on that down arrow. After clicking, you’ll see options like inches, millimeters, and centimeters. Okay? I’m selecting inches.
Now, I want the card size to be A4 size. So I’m giving the width and height as 8.5 x 11. If you want it in portrait mode, give the width as 11 and the height as 8.5, and then click on “Create a new design.” A new window will open with the card design. Now, this is the card. Okay? After this, we need to design on it.
Suppose you don’t want this custom size; then when you type “invitation” in the search option, you saw many options below, right? You can select whichever one you want from there. For example, if I want the 14×14 size, I just need to click on it. In a new window, you will get the size of the invitation card. See? Now we have created the card. Now we need to add a design to this card.
We can zoom in and zoom out on this card. Now, at the bottom, you can see it’s at 60% zoom. If you want to zoom in on the card further, see this dot? Click on it and drag it to this side, and the zoom will increase. If you want to zoom out, click here and drag it in reverse, and it will zoom out. Now let’s see how to add a design to this card.
Choosing Invitation Templates in Canva
Now, on the left side, you can see many icons, right? Currently, it’s in Elements. Above that, you can see Design, right? Click on that design. After clicking on Design, you will see two options on the side: Templates and Styles. Okay? Select Templates. After selecting it, you can see a search option above, right? Place the cursor there. In this search option, type the type of invitation you are going to create. For example, if it’s a graduation function, type “Graduation.” Below that, you will see “Graduation Invitations,” right? Select that. After selecting it, if you look below, all the styles within it will be displayed here. You can select whichever style you want from these options.
I’m going to show you how to create a birthday invitation. So, I’ll clear this. After clearing it, type “Birthday.” Here, you can see “Birthday Invitation,” right? I’ll select this. After typing “Birthday Invitation,” you can see that numerous template styles have been created below. You can select whichever design you like from these.
I’m selecting this style. Just one click is enough. Now you can see that the design has been created on the card. Now you can edit the text on this card however you want. Just move the cursor to the name. Take it there and double-click on the name. As soon as you do that, the entire name will be selected like this. After this, you can type whatever name you want.
Customizing Invitations in Canva (Fonts, Colors, Images)
Now you can even change the font, font size, and color of this name. Select the entire name. After selecting it, if you want to change the color, do you see “Text Color” here? Click on this ‘A.’ Select the color you want from here. Similarly, if you want to change the font size, click on this, and you can change the font size and the font itself. Okay? Not only can you edit the text, but you can also insert new text if you want.
How to do it is, if you look on the left side, there were many icons, right? Here, do you see “Text”? Click on this text. As soon as you click on the text, you’ll see “Add a text box” near it, right? Click on this. As soon as you click, you’ll see that a text box has been added. Now you can type whatever text you want in it.
Now, as you can see, I have typed “Happy Birthday.” You can also change the font and font size if you want. Now you can move this text to any position you want. Just click on it and drag it like this, and it will move. Now you can place it in whatever position you want.
You can also delete the image that is there. Just select the image. After selecting it, if you press the delete key on the keyboard, it will be deleted. Suppose you want to add a different image; you can do that too. For that, there were many options, many icons on the left side. Do you see “Elements” here? Click on these elements.
Now, above the elements, there is a search option, right? Click on this, and you can search for whatever image you want. Now I’m typing “cake” in this search option. Suppose you don’t want a butterfly image; you can search for any other image you want, and that image will appear. Now, as you can see, I’m selecting “cake.” After selecting it, do you see “Photos”? I’m clicking on “Photos.” As soon as I click, you can see all the cake photos are displayed here.
Free vs Pro Canva Invitation Maker Options
The important thing here is, do you see the images with a crown and “PRO” written on them? Do not insert such images. If you insert them, you won’t be able to download this invitation card as a PDF or JPEG. Because this is a free version. Do you see “Get Canva Pro” here? If you click on this and pay, you can insert these “Pro” images and then create your design.
Since this is a free version, do not insert images that have “Pro” written on them. I’m going to insert this first cake image. Just clicking on the image is enough; the image will be inserted. After this, if you want to resize this image, you can click and drag to resize it. If you want to change the position of this cake, select the cake and click and drag it to the desired position.
Suppose you are unable to select any of the images here; there will be another image on top of it, and that’s what will be selected. So, you need to send that image to the back. To do that, simply select the image and right-click. Then, you see “Layer” there? Move the cursor to that “Layer” option. Here, since our image is in the front, this option is not enabled.
“If you’re exploring digital tools, check out our Meesho app review How to Successfully Sell on Meesho Without GST Complete Guide
Now, if you click “Send to Back,” that layer, the cake layer, has gone behind all the other images. Suppose you want this cake image in the front; now you can’t select the cake. Select the image that is in front of it, right-click, and move the cursor to the “Layers” option. Now, if you want to send it to the back, click “Send to Back” for the image that is in front. Now, the cake image has come to the front.
Not only that, you can even insert your own pictures here. To do that, on the left side, you saw many icons, right? Among them, there is “Uploads.” Click on “Uploads.” Here, you see “Upload files,” right? Click on this. As soon as you click, go to the location where your image is, select the image you want to upload, and click “Open.” As soon as you provide it, you can see that the image has been uploaded. Here it is, right? This is the image.
Now, to insert this image here, simply click on the image. As soon as you click, the image will be inserted. After this, resize the image to the desired size and place it in the desired position. Now you can see that our birthday invitation has been created.
Downloading Your Canva Invitation as PDF or JPEG
Next, let’s see how to download this as a JPEG or PDF. Now, in the top left, you see “File,” right? Click on that File option. As soon as you click, you’ll see “Download” below it, right? Click on that Download option. When you click, you’ll see that the file type is set to PNG. Click on the arrow. If you want it in JPEG, select JPEG, or if you want it in PDF, select PDF. You can create it however you want.
Now, I’ll show you how to create it as a PDF. Just click on “PDF Standard.” After clicking, you’ll see “Flatten PDF,” “Included notes,” etc. Okay? We haven’t included any notes. So, you can select Flatten PDF if you want, or leave it unchecked if you don’t. I’ll select it and show you how it looks. After that, click on “Download.” As soon as you click, the file will start downloading.
If you haven’t used any pro version images, it will download. But if you have used pro version images, it will not download. Now, as you can see, the file has been downloaded in PDF format. Let me open and show you. As you can see, this is the invitation we created. Similarly, you can create invitations in many different styles with designs of your choice.